
What is Shopify?
Shopify is an e-commerce CMS platform that allows businesses to create their own online store and sell products and/or services to customers online. Since its founding in 2006, Shopify has grown to become one of the most popular e-commerce platforms in the world, according to BuiltWith, a website that tracks technology usage on the web. As of September 2021, there were over 1.9 million live websites using Shopify worldwide.
Shopify offers a range of features including product and inventory management, payment processing (Shop pay), customer communications (Shop app) and order fulfillment, making it easier for businesses to sell online. A wide range of customizable front-end templates and themes are offered to create visually compelling online stores to create a more branded look.
Shopify is easy to use, even for businesses with little or zero technical expertise, offering a range of pricing plans to suit businesses of different sizes and budgets.
What is Shopify SEO?
Shopify SEO refers to the process of optimizing your Shopify store’s website and content to improve its visibility and ranking on search engines including Google and Bing. The goal is to make your Shopify store appear as highest (as possible) in search engine results pages (SERPs) when your target audiences (i.e. your potential customers) search for your products or services online.
The main elements of your Shopify (and any!) SEO campaign can be reduced to:
- Shopify 2.0 theme: Shopify is much scalable for SEO if the store uses a Shopify 2.0 theme as these themes use reusable components (i.e. blocks and sections) such that your optimisations will implement at scale across multiple-page templates while reducing your development cost.
- Keyword Research and Content Gap Analysis: Identifying the keywords that your target audiences use to search and find your products and services. These can be sourced from internal (1st party) data sources like Google Search Console (GSC) and SEO tools such as SEMRush/AHREFs to find keywords driving traffic to your competitors.
An effective way to broaden your search visibility would be to ensure you separate the attribute value names from the product variable names as the different collection variants get indexed (i.e. included in the search results) these quite easily. More hacks below. - Keyword Mapping and Content Creation: Once the keywords are known, the next step is to allocate the keywords to the URLs. Any URLs that don’t have the required content should be created.
- On-Page: Ensuring the website’s content, headings, images, and meta tags to align with the target keywords. This process helps with getting pages included into the search results (known as Indexing), such that when users search online, Google et al will know which URL to display.
- Technical: Making content more discoverable so search engines can find it (known as Crawling), which includes internal links, domain configuration site speed, mobile-friendliness, schema and navigation among other numerous items! Some key technical SEO factors specific to Shopify that impacts your store’s organic visibility include:
- Duplicate Content: Shopify generates multiple versions of the same page in particular collection pages causing duplicate content issues. That’s because Shopify creates unique URLs for each products, collections, or blog posts, leading to the same content being published on multiple URLs. Search engines get confused as they are forced to select the correct (i.e. canonical) URL which will often lead to lower ranking positions.
- Page Speed: Shopify sites are known to be slow to load out of the box due to large image file sizes or inefficient code.
- Site Architecture: Shopify will often create complex site architectures, making it difficult for search engines to discover site content. This results in pages not being indexed or being indexed but not ranking very highly.
- Structured Data: Helps search engines understand the context of page content of which the outcomes are enhanced exposure in voice search and higher click through rates from visually enhanced search result listings. These are not optimised as a default by Shopify and are more of a missed opportunity.
These will be covered in more detail in later sections.
- Digital PR: The goal is to increase your site authority which is usually achieved by attracting links. The most reliable method is to create content that is a highly popular useful resource which usually results in sites crediting your content with a link. This will involve proprietary research, content creation and PR outreach to journalists and writers at high traffic sites.
The above SEO process is of course not exclusive to Shopify stores. This guide will walk through the SEO issues and requirements that are specific to Shopify and virtually all technical.
Shopify SEO Issues
Duplicate content
The following duplicate content SEO issues arise from the Shopify CMS:
Products: Are individual product items which have their duplication challenges because of:
Variants
You can specify product variants for a given product which unfortunately creates parameterised URL as shown below:
- Product: /products/example-product
- Variant: /products/example-product?variant=1234567
If your online store offers multiple product variants (e.g. different sizes, colors, or materials), you will have multiple product URLs with near duplicate content making this challenging if you want your product variants to be indexed.
Multiple Paths
Another cause of product page duplication are multiple user click routes to the same product, for example:
https://lunzerwine.com/collections/wine-shop/products/chateau-lamothe-cissac-2018-haut-medoc?_pos=1&_fid=641851c7d&_ss=c click from the Red Wine collections page is a duplicate URL version of the same page:
https://lunzerwine.com/collections/wine-shop/products/chateau-lamothe-cissac-2018-haut-medoc
This is observed with tags as Shopify allows you to add tags to your products, blog posts, and other content. If you use the same tags on multiple pages, you will create duplicate content issues due to multiple paths.
One of the hacks to avoid PDPs (products) appearing as multiple URLs (due to appearing in multiple collections also generating multiple pathways) would be to edit your theme code, find a snippet called “product-grid-item.liquid” or “product-card-grid.liquid” > Varies by theme > Find: “within:collection” Then Delete it and click save.
That way there will be only 1 URL for that product item (PDP) as well as your hreflang tags and unique URLs for each language/currency if you’re selling internationally.
Featured Products
Shopify provides the facility to promote ‘featured’ products which despite using canonicals on parameter ‘featured’ URLs, can cause a high volume of duplicated content – due to the high volume of internal links to them (i.e. links to non canonical URLs!). Using the hacks above, canonical tags and internal links to the primary versions of the URL will mitigate this.
Recommended Products
Shopify also provides “recommended products” however this can create bloat for search engines as a lot of these URLs use to end up being indexed. Fortunately the team at Shopify have updated their systems so that the PDPs self canonicalise and any products that expire now 404.
These URLs usually show up as parameters:
?pr_prod_strat=description&pr_rec_id=
Collections: Collections in Shopify are effectively product categories and subcategories. If you create multiple collections that include the same products, you may end up with duplicate content issues for a number of reasons.
Dynamic URL parameters
The Red Wine collection page (https://lunzerwine.com/collections/wine-shop?filter.p.m.my_fields.wine_type=Red+Wine) is a duplicate of The White Wine collection page (https://lunzerwine.com/collections/wine-shop?filter.p.m.my_fields.wine_type=White+Wine).
To a search engine these pages look the same, because both URLs are configured to use parameters:
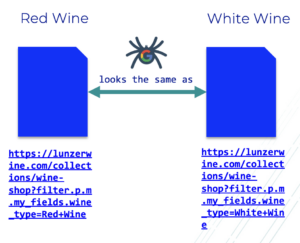
The solution here is to create static URLs for each collection page and ensure these are self canonicalized.
Duplicate headings (h1) for collections
The other issue to note is the lack of heading change when the user navigates between collection URLs:
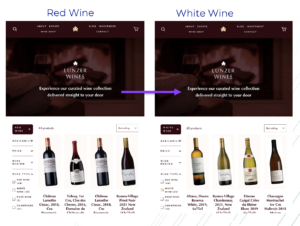
The solution, after implementing static URLs is to ensure the headings are specific to each collection page as shown below:

This will signal to the search engines what the content is about and what keywords the page should rank for.
Duplicate content can also arise on many collections from a single edit of a collections URL because the edited template was identical to another collection template used on other collection pages. Instead use a unique template for each collection/sub-collection pages you want to optimise, to avoid this issue. This hack will impact your breadcrumbs, and there are other workarounds for this.
Canonical tags
Canonical tags tell search engines which version of a page is the primary version (i.e. canonical). By using canonical tags, you can signal very clearly to search engines which of the multiple versions of the same page is the primary version.
In Shopify, the canonical tag for product item pages is natively set to the clean URL which would be /products/product-item which avoids duplicate product urls for products that live in multiple collections.
If you want to match the canonical tag then the Product item URL path will need to be rewritten such that the url is just /products/product-item (i.e. the default canonical URL path syntax)
This is changed by editing the product.liquid file under snippets from
<href= “{{ product.url | within: collection}}”>”
to
<href= “{{ product.url}}”>”
Set up redirects
Shopify offers the facility to 301 redirect URLs (i.e. permanently). If you have multiple pages with similar content, consider setting up redirects to the primary page to consolidate the content if you don’t wish the redirected content to be viewed by users and the page has a backlink. For this reason, Shopify will only allow pages which have first been deleted before they can be redirected. To redirect:
- Log in to your Shopify admin panel and go to Online Store > Navigation.
- Click on the “URL Redirects” tab.
- Click on the “Add URL redirect” button.
- In the “Redirect from” field, enter the URL you want to redirect from. This can be either a specific page on your website or an entire collection.
- In the “Redirect to” field, enter the URL you want to redirect to. This can be a specific page on your website or an external URL.
- Click on the “Save” button.
If you delete a page by accident, you can use the Rewind Backups app to undo any unintended changes.
One thing to note is that Shopify doesn’t provide for 302 redirects which can be an issue if you’d like to keep a URL in the search results before deciding where to redirect permanently or stop redirecting altogether.
Also, there is a limit of 100,000 redirects with Shopify could pose an issue if you’re undergoing a site migration, as you may not be able to redirect all the site URLs to your new site.
Robots.txt
The default robots.txt behavior for Shopify CMS is to allow all search engine crawlers to access and crawl all pages on the site. The default robots.txt behavior for Shopify store is to prevent crawling of:
- Admin area
- Checkout
- Orders
- Shopping cart
- Internal search
- Policies page
The directories that should be blocked in robots.txt for Shopify CMS may vary depending on the specific needs and configuration of your store.
Since June 2021, Shopify allows store owners to edit the robots.txt document. This can be useful for:
- Preventing certain URLs from being accessed (Disallow)
- Adding extra sitemap URLs.
- Blocking certain crawlers
To edit, you’ll need to create liquid theme template first:
- Log in to your Shopify account and go to your admin dashboard.
- From there, click on “Online Store” in the left-hand menu, then select “Themes”.
- Click on the ellipsis button (…) and select edit code
- Click “Add a new template”, select robots.txt and click “Done”
You’ll have created “robots.txt.liquid” which is now ready to be edited and can be used to set custom rules. For example, to disallow crawling of the policies subdirectory:
{% for group in robots.default_groups %}
  {{- group.user_agent }}
  {%- for rule in group.rules -%}
    {%- unless rule.directive == 'Disallow' and rule.value == '/policies/' -%}
      {{ rule }}
    {%- endunless -%}
  {%- endfor -%}
  {%- if group.sitemap != blank -%}
      {{ group.sitemap }}
  {%- endif -%}
{% endfor %}
More Shopify robots.txt guidance is provided here.
An alternative is to use Cloudflare Workers to edit the robots.txt to manage URL discovery and search engine access which includes accessibility to faceted navigation.
For example, you may have noticed a load of 404s in your Google Search Console being generated by WPM URLs as early as Feb 2023.
Out of Stock (OOS)
To notify users when something comes back into stock, use the ‘out of stock’ UI option that allows users to be notified and don’t hide out of stock products nor temporarily redirect OOS as a method of managing out of stock products.
For most Shopify stores, product redirects should only be used when a product has been discontinued or is one off.
Redirecting users or search engines from a out of stock product to a similar (or less similar PDP) is bad UX and more akin to a soft 404.
What are Shopify’s Web Pixel Manager (WPM) Resource URLs
These WPM URLs are clearly not meant to be indexed by Google or any search engine, yet for some reason Shopify made these available to the Google index. Thankfully Shopify has now noindexed these at the X-robots server level.
Before you attempt to use the above technique to disallow – don’t! Google needs to access the URL (i.e. crawl) in order to have these noindexed.
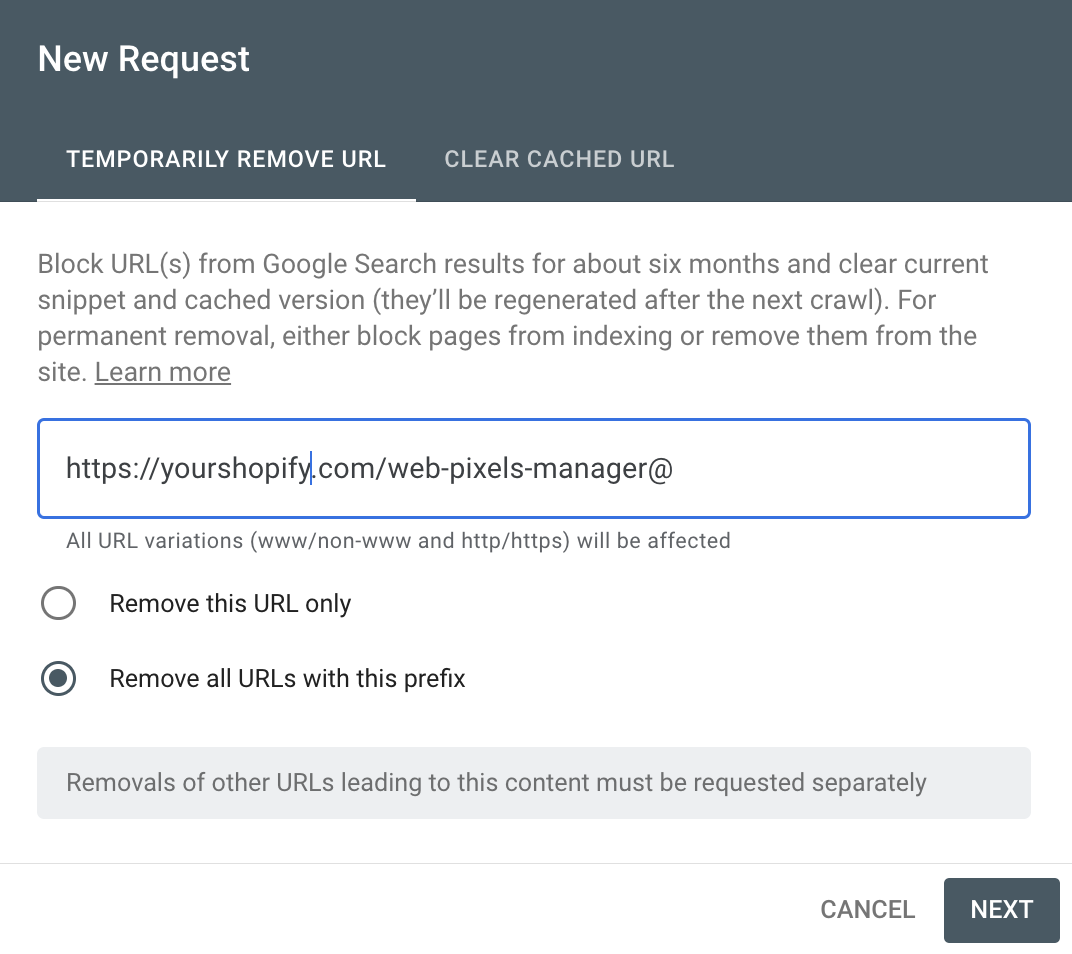
If you find your wpm URLs are indexed, what you can do is go to Google Search Console (GSC), and use the Removals tool (under Indexing). Submit your wpm URLs with prefix for removal that is both:
- /wpm@
- /web-pixels-manager@
XML Sitemaps
Shopify automatically generates an XML sitemap for all Shopify stores, which includes all pages, products, and collections that are visible to search engines. This sitemap is dynamically generated and updated whenever new content is added or removed from the store.
By default, Shopify’s XML sitemap is a master sitemap which contains links to separate sitemaps including products, pages, collections and blogs as shown below:
<sitemapindex xmlns="http://www.sitemaps.org/schemas/sitemap/0.9">
<!--  This is the parent sitemap linking to additional sitemaps for products, collections and pages as shown below. The sitemap can not be edited manually, but is kept up to date in real time.  -->
<sitemap>
<loc>https://yourshopifysite.com/sitemap_products_1.xml?from=7562130850009&to=8126439751897</loc>
</sitemap>
<sitemap>
<loc>https://yourshopifysite.com/sitemap_pages_1.xml</loc>
</sitemap>
<sitemap>
<loc>https://yourshopifysite.com/sitemap_collections_1.xml</loc>
</sitemap>
<sitemap>
<loc>https://yourshopifysite.com/sitemap_blogs_1.xml</loc>
</sitemap>
</sitemapindex>
Beware of orphaned pages such as published pages which are no longer crawlable from the homepage as these will either need to be reintegrated into the site navigation or removed from the XML sitemap.
However you may wish to use a custom XML sitemap because you’re:
- migrating toe to Shopify and/.or changing URL structure want to help Google et al process redirects and.or remove old URLs from their search results
- consolidating site sections
- including canonical product variants not yet included by Shopify in sitemaps
In that case, to submit a custom XML sitemap:
- Upload your custom XML sitemap file to Shopify which will reside on its CDN
- Create a 404 URL which will be used to redirect to the custom XML sitemap
- Redirect the 404 URL to the CDN address of the custom XML sitemap
- Upload the 404 URL to Google Search Console (GSC)
Within a week or less, you’ll see a coverage report for the custom XML sitemap.
Noindex, Nofollow and Meta Robots
By default, Shopify does not add a noindex tag to any of its pages or content. This means that all of your site pages are indexed by search engines and are potentially visible in search results.
However, Shopify does provide a way to add a noindex tag to specific pages if you do not want them to be indexed. This can be done by editing the theme code or by using the Sitemap & NoIndex Manager SEO app or plugin.
To add noindex/nofollow tag(s) using the theme code:
- In Shopify admin, go to Online Store then Themes.
- Click Themes you want to edit, click the ellipsis (…) button to open the actions menu, and then click Edit code.
- Click the theme.liquid layout file.
- To exclude the search template, paste the following code in the <head> section:
{% if handle contains 'page-URL-you-want-to-exclude' %} <meta name="robots" content="noindex"> {% endif %}
To exclude an entire subfolder for example, a section of a collection :
{% if template contains 'collection' and current_tags %}

{% else %}
{% endif %}
Onpage Optimisation
Shopify gives you the facility to edit you title tags and descriptions of your product and collection pages. However if you have thousands of products then that could be quite time consuming. Use the bulk edit SEO fields (title, description, and handle) using the Bulk Edit button which will be much more quicker and scalable.
Schema and Structured Markup
Structured data is used to provide content powering Google Rich Results, Rich Snippets & the Merchant Center (Google Shopping, Ads, YouTube Shopping). Structured markup helps Shopify sites get more organic search traffic by using Schema code to highlight your reviews, prices, & business details in these search results. Google recommends that the JSON-LD format is implemented of which the tags will reside inside the </head> section.
The general steps for adding schema to your Shopify site are:
- Identify your schema requirements: For your store these are likely to be:
- Product: provides more detailed information about your products, including product name, description, price, availability, and reviews (average rating, number of reviews). Set your product item (PDPs) pages as ItemPage with Product (and offers property) instead of WebPage.
- Article
- Breadcrumb: help search engines to understand the structure of your site and how different pages relate to each other.
- How-To
- Video
- FAQ Page
- Organization: help search engines to understand the relationship between your store and your social media presence. This will improve your social media engagement in terms of getting more likes and followers.
- Generate the schema markup: Once you have the requirements and the content, use a markup generator.
- Add the schema markup: You can add the schema markup to your Shopify CMS site using one of the following methods:
- Edit the theme code: If you have knowledge of HTML, CSS, and Liquid, you can edit the theme code to add the schema markup. To do this, navigate to Online Store > Themes > Actions > Edit Code, and then locate the file where you want to add the schema markup. Paste the schema markup code in the appropriate location in the file.
- Use a Shopify app (recommended): There are a few apps that help facilitate this:
- JSON-LD for Shopify: Offers free audits
- Schema Plus for SEO: Developed by ex-Googlers and used JSON-LD format
- Schema and Breadcrumbs
- Test the schema markup: After adding the schema markup to your site, test it using Google’s Structured Data Testing Tool which will help ensure correct implementation such that search engines can understand it.
Site speed
Improving site speed by 10 points in Core Web Vitals’ (CWV) performance metric can boost Google rank by as much as 2 positions on average. There are a number of measures you can take to improve site speed:
- Remove any irrelevant apps: Shopify apps can have an adverse effect on your site speed as some create ‘code bloat’ which automatically injects code upon installation. Some also create extra resources to load when your customers visit the page. So for any apps that aren’t in use – remove them including any associated files from your theme code
- Lazy loading: Lazy loading prevents loading offscreen (those that are out of view) resources (such as images) until they are required which reduces the number of files that are needed to be loaded before the point of user interaction, making the site load faster. For example, lazy load offscreen images. To check the Elements panel in Chrome Dev Tools for images that aren’t lazyloaded, use the following XPATH: “//img[not(contains(@loading,”lazy” or contains(@class, “lazy”) or contains(@class, “lazyloaded”))]”
- Dynamic serving images: Themes can be set to “srcset” to pull appropriate image sizes based on screen resolution making the page device responsive and faster loading.
- Compression: e-commerce sites tend to be image-heavy due to visitors wanting good visuals of the products they’re looking to buy. Of course, the higher resolution and sizes of the images lead to a slower loading time. Compressing images and other resource files can help speed up the page load. Crush.pics is a Shopify app that can assist with image compression and OptiPic Image Optimizer will compress and resize your store’s images. ROAR Page Speed Booster includes a minify feature that compresses your HTML, CSS, and JavaScript files to reduce their size and improve load times.
HREFLANG & International SEO
The goal of international SEO is to ensure the correct URL version of your Shopify store page shows up for the user’s country and language of search. There are a number of considerations for international SEO, the main ones being:
- Domain configuration: Whether to host content by country and language in multiple regional domains or subdomains of a single domain – both supported by Shopify. While Shopify doesn’t support international subdirectories of domain (e.g. /fr/ for France) as a configuration, your products can be duplicated to ensure that alternate language/location sites contain the same products.
- IP address: Of the server hosting the content. For example a French store will be better optimised for Google France if it’s hosted on a French server IP address
- HREFLANG: Markup language signaling to search engines which URL version of the content to serve in response to the audience’s preferred language and region. Shopify by default doesn’t contain HREFLANG and cannot be implemented via sitemaps, however, the markup can be added to the theme.liquid inside the </head> section:
- <link rel=”alternate” hreflang=”x-default” href=”{{ canonical_url | replace: shop.domain, ‘www.yourshopify.com’ }}” />
- <link rel=”alternate” href=”{{ canonical_url | replace: shop.domain, ‘www.yourshopify.nz’ }}” hreflang=”en-nz” />
- <link rel=”alternate” href=”{{ canonical_url | replace: shop.domain, ‘www.us.yourshopify.com’ }}” hreflang=”en-us” />
- <link rel=”alternate” href=”{{ canonical_url | replace: shop.domain, ‘www.yourshopify.com.au’ }}” hreflang=”en-au” />
- <link rel=”alternate” href=”{{ canonical_url | replace: shop.domain, ‘www.mysyourshopifytore.com’ }}” hreflang=”en” />
One thing to beware of is that Shopify creates international stores as copies of its original store which means that URLs will be in the original language causing HREFLANG errors where an existing product in one region will be HREFLANG referenced in another regional store even if it doesn’t exist!
Use the following apps to translate your website content and help create your HREFLANG:
Shopify offers an International Domains feature allowing store operators to create and manage multiple online stores with different domain names for different countries or regions, which covers:
- Country configuration: Create a separate online store for a specific country or region, which will have its own domain name and currency. For example, if a store owner has a store in the United States with the domain name “www.mystore.com,” they can create a separate store for customers in Canada with the domain name “www.mystore.ca.”
- Currency Pricing: Set prices in different currencies for each store, customization of shipping and tax settings based on the country or region. This improves the customer shopping experience helping users view prices and checkout in their local currency.
- Auto translation: Automatic language translation is offered so users can view the store in their preferred language helping expansion into new markets around the world.
Blog Posts
Shopify blog features for content editing include:
- Metadata (titles, meta descriptions etc)
- Headings and lists
- Author assignment
- Publishing date
- Categories (ie news etc)
- Tags
Since categories are linked to from the blog post which are indexable, exercise caution to avoid redundant URLs being included i.e. lacking volumes of blog posts in the category.
A default feature of Shopify’s blog is the ‘Back to news’ function in that these are included below the body copy of each blog post which is redundant as most navigation includes a link to the blog section.
The blog posts can be enriched with Schema.org markup. See here.
Site structures
In general, a Shopify site structure should be compartmentalized into the store and the blog. Within the store there should be categories (known as collections), sub collections and product items keeping the items within 3 hops of the store home page.
URL Structures
Shopify content is very easy to set up thanks to their URL structures:
- Products: /collections/collection-name/products/product-item
In Shopify, product URLs are within a product subfolder within a collection path as shown above. The canonical tag by default is set to /products/product-item (i.e. without the collection subdirectories). See Canonical tags above.
- Collections: /collections/collection-name or /collections/collection-name/tag-name
The URL structures can be quite restrictive as collection folder names cannot have a ‘/’ in them, any attempts to do so will be changed to a hyphen.
To create sub-collections, the best way forward is to use tags and ensure it has content and meta data pertaining to it, which is a SEO hack but not so scalable from an admin perspective.
Shopify natively only supports basic filtering using tags which while useful for UX this is often not enough for many eCommerce sites.
- Pages: /pages/page
- Blogs: /blogs/news/blog-post-item
Breadcrumbs
Breadcrumbs are useful for helping users navigate the website and assisting search engines to understand the information architecture of a website. This will also help overcome the subfolder limitations discussed earlier. Using Schema, the appearance of the URLs will be visually enhanced in Google’s search results. By default, Shopify doesn’t support breadcrumbs but they can be added to the CMS despite being limited to a click depth of 3 levels (i.e. Home > Level 1 > Level 2 > Level 3).
To add and edit breadcrumbs you’ll need to edit the theme.liquid file. The following is code that bases the breadcrumbs on the Shopify menu structure as provided by Idea Wrights:
{%- unless template == 'index' or template == 'cart' -%}
  <a href="/" title="{{ 'general.breadcrumbs.home_link_title' | t }}">{{ 'general.breadcrumbs.home' | t }}</a>
  {% for link in linklists.main-menu.links %}
    {% if link.child_active or link.active %}
    ›
      <a href="{{ link.url }}">
      {{ link.title | escape }}
      </a>
      {% for clink in link.links %}
        {% if clink.child_active or clink.active %}
        ›
          <a href="{{ clink.url }}">
          {{ clink.title | escape }}
          </a>
          {% for gclink in clink.links %}
            {% if gclink.child_active or gclink.active %}
              ›
              <a href="{{ gclink.url }}">
              {{ gclink.title | escape }}
              </a>
            {% endif %}
          {%- endfor -%}
        {% endif %}
      {%- endfor -%}
    {% endif %}
  {%- endfor -%}
{%- endunless -%}
The alternative is Webify Metafields editor for Shopify.
Apps
In addition to Shopify Apps for SEO already mentioned, there are:
- Plug in SEO: Provides a checklist of items to improve your SEO, such as meta tags, headings, and image optimization.
- “Sitemap NoIndex Pro“: Paid versions will help with robots management
- “Canonical Tag URL Wizard“: Set canonical tags
- FavSEO: Edit meta tags in bulk, create sitemaps, and optimize your Shopify site structure. The app also integrates with Google Search Console (GSC).
- Crush.pics: compress images within your Shopify store.
- SpurIT SEO Image Optimizer: Automatically adds image ALT tags and compressing images.
Shopify Analytics
While Shopify analytics can help improve SEO, it can also offer a deluge of data. A useful report however is the Sales by Product report which can help you prioritize which product item pages to add content to. The chances are that 20% of your products drive 80% of the revenue.
Here at Artios, we’ve helped a number of ecommerce businesses growth by optimizing their Shopify often achieving significant revenue shifts in 4 months. Why not get in touch with us and find out how we could help your business with Shopify SEO.
FAQ
Is Shopify Good for SEO?
Yes Shopify is good for SEO. While optimisations will need to be made to control the interaction of your store with Google, as shown with web pixel manager URLs, the team at Shopify learn fast and update their systems to counter search engine issues as they arise in a timely manner.
How do I customize Shopify robots.txt?
Shopify doesn’t support customizing your robots.txt. However, there are solutions such as editing to theme liquid file or using Cloudflare Workers to make adjustments to your robots.txt